
Crop
Trim PDF margins or change the visible page area.
or drop a PDF here
No file selected
Step by step
How To Crop a PDF
Trim away the white margins or decide exactly what stays visible — from a one-click automatic trim to hand-drawn crop areas.
-
1
Upload your PDF
Drop in a document and the crop screen opens with three ways to work. Files are deleted after 2 hours.
-
2
Choose how to crop
Automatic trims the same box of margins on every page — one clean size all through. Automatic maximum crop hugs each page's own content, as tight as it can. Preview pages & select hands you the box to adjust.

-
3
Fine-tune and crop
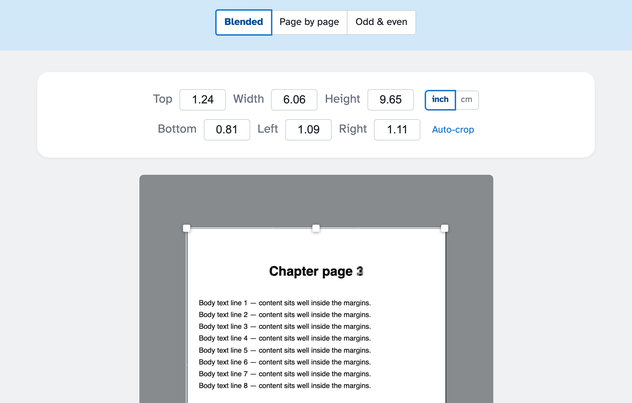
The box opens already hugging the page's content — drag it or its handles, or type Top / Width / Height / Bottom / Left / Right in inch, cm or points; Auto-crop snaps it back to the ink at any time. Blended keeps one box over every page, Page by page gives each page its own (Apply to all copies it down the stack), and Odd & even keeps a box per side of a spread. Press Crop PDF — content outside the box is hidden, not deleted.
-
Three ways in
One automatic trim for all pages, a tight per-page trim, or hand-picked areas.
-
Type or drag the box
Drag the box and its handles on the page, or type exact values in inch, cm or points.
-
Auto-crop
One click snaps the box back to the page's own content — used when the editor opens.
-
One box, per page, or odd & even
Blended, Page by page and Odd & even previews — Apply to all copies a page's box down the stack.
-
Hidden, not deleted
Content outside the crop area is hidden but stays in the file — the screen says so itself.
-
Private by default
No account, no watermark — and every file is automatically deleted after 2 hours.
Selected:
Choose an option
Selected:
Preview mode
Content outside the crop area is hidden but not completely removed from the document
Files stay private. Automatically deleted after 2 hours.